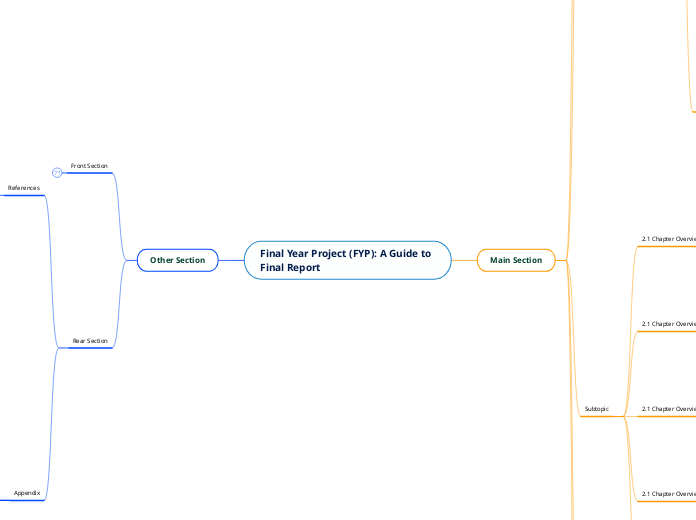
Final Year Project (FYP): A Guide to Final Report
Other Section
Rear Section
Appendix
Appendix I: Industrial Collaboration Letter
Appendix H: Industrial Support Letter
Appendix G: Project Inventory
Appendix F: Project Image
Appendix E: User Manual / Datasheet
Appendix D: Engineering Drawing using Software
Appendix C: Table of Individual Duties by Project Scope
Appendix B: Cost / Profit Margin / Selling Price Analysis
Appendix A: Milestone Project 1 and Project 2
i. What it is?
References
1. Identify all quotations or ideas that are not your own and that you have included in your project.
2. For each of these, note down the author’s initials and surname, the title of the work, the title of the publication, volume, issue, page numbers, and year of publication.
3. Arrange these details into a citation. The exact format will depend on the type of source (e.g., journal article, book chapter, website).
4. List all citations numerically in the order they appear in your text in the “References” section.
It gives credit to the authors whose works have contributed to your project. It also allows others to follow your research process.
The “References” section is a detailed list of all the sources you have referred to or quoted in your project.
Front Section
List of Appendix
1. Number each appendix in the order they appear in your report.
2. Provide a brief description of each appendix.
3. Include the page number where each appendix can be found.
Allows readers to quickly locate specific appendices in your report.
A list of all appendices included in your report.
List of Abbreviation
1. List each abbreviation used in your report.
2. Provide the full form for each abbreviation.
Allows readers to understand the abbreviations used in your report.
A list of all abbreviations used in your report.
List of Symbol
1. List each symbol used in your report.
2. Provide a brief description or definition for each symbol.
Helps readers understand the symbols used in your report.
A list of all symbols used in your report.
List of Figure
1. Number each figure in the order they appear in your report.
2. Provide a brief description of each figure.
3. Include the page number where each figure can be found.
Allows readers to quickly locate specific figures in your report.
A list of all figures (diagrams, graphs, photographs) included in your report.
List of Table
1. Number each table in the order they appear in your report.
2. Provide a brief description of each table.
3. Include the page number where each table can be found.
Allows readers to quickly locate specific tables in your report.
A list of all tables included in your report.
Table of Content
1. List all the main sections and sub-sections of your report in the order they appear.
2. Include page numbers for each section.
Helps readers navigate through your report and understand its structure
An organized listing of the sections and sub-sections in your report.
Abstract
1. Begin by briefly describing the problem your project addresses.
2. State the objectives of your project clearly.
3. Describe the methodology you’ve used to achieve these objectives.
4. Summarize your key findings or results.
5. Conclude the project
Gives readers a quick overview of the project’s purpose, methods, and findings.
A brief summary of the project
Acknowledgement
Recognizes the help and support from others
A section expressing gratitude towards contributors to the project.
Declaration of Authenticity and Ownership
iii. Example
Ensures academic integrity and prevents plagiarism
A statement affirming the originality and ownership of the work
Main Section
Subtopic
Chapter 2: Literature Review
2.5 Method of Fabricate for the "YOUR PRODUCT"
Identify Fabrication Method: Describe in detail how your project component was fabricated or assembled.
Explain Fabrication Methods: Explain why certain fabrication methods were chosen and how they contribute to the overall project.
Figure: Include diagrams or sketches if necessary to help illustrate your fabrication process.
Review: Review your fabrication description to ensure it is accurate and comprehensive.
It clarifies how the project was physically produced and highlights the methods used.
This section covers the techniques and methods used in fabricating or creating the project. It explains the processes and procedures involved in making it.
2.4 Concept of the "YOUR PRODUCT"
Define Key Concept: Explain the main concept or theory that your project is based on.
Relevance: Describe how this concept is applied in your project.
Review: Review your explanation to ensure it accurately represents the concept and its application in your project.
It provides a theoretical foundation for your project and explains the underlying ideas.
In this section, you would discuss the conceptual aspects related to your project. This could include the fundamental ideas, theories, or concepts that underpin your project.
2.3 Design of the "YOUR PRODUCT"
Explain Design Process: Describe the design process of your project component in detail.
Application: Explain why certain design choices were made and how they contribute to the overall project.
Figures: Include diagrams or sketches if necessary to help illustrate your design.
Review: Review your design description to ensure it is accurate and comprehensive.
It establishes the foundation for the project's design and explains the thought process behind it.
This section covers the design concepts relevant to the project, including the principles, theories, or models used in designing the project.
2.2 Material of the "YOUR PRODUCT"
List Materials: Enumerate the various materials used.
Specifications: Provide specifications for each material.
Relevance: Explain why these materials were chosen.
Review: Review your list to ensure it is comprehensive and accurately represents all the materials used.
It offers background information on the materials used in the project, serving as a reference for understanding the project's construction.
In this section, you would detail the materials relevant to the project, such as the types, specifications, and characteristics of materials used.
2.1 Chapter Overview
Identify Key Themes: Identify the main topics that will be covered in this chapter.
Provide a Glimpse: Write a brief summary of each topic, explaining its relevance to your project.
Review: Review your overview to ensure it provides a clear, concise snapshot of what this chapter will cover.
This section gives the reader an initial sense of what to expect in the literature review, helping them understand the structure of this chapter.
The "Chapter Overview" provides a brief summary of what the Literature Review chapter will cover. It outlines the key themes, topics, or areas you'll discuss in your review of existing literature related to your project.
Chapter 1: Introduction
1.4 Scope
1. Define Scope Boundaries: Specify what the project will address and what it won't.
2. Inclusions and Exclusions: Detail what aspects are within scope and what is beyond it.
3. Rationale: Explain why certain elements are within the scope and others are excluded.
4. Review: Review your scope to ensure it accurately represents the boundaries of your project.
The scope section prevents misunderstandings and sets expectations for what the project covers and what it does not.
The "Scope" section outlines the boundaries and limitations of your project. It defines what is included and excluded, helping readers understand the project's boundaries.
1.3 Objective
1. Define Objectives: List clear and achievable project objectives.
2. Scope Alignment: Ensure that the objectives align with the problem statement and project scope.
3. Measurable Outcome: Ensure your objectives are specific, measurable, achievable, relevant, and time-bound (SMART).
4. Review: Review your objective to ensure it accurately represents what you aim to achieve.
Objectives provide a roadmap for the project, guiding the research and activities to reach a successful outcome.
The "Objective" section outlines the specific goals and outcomes you intend to achieve with your project. It defines what you aim to accomplish.
1.2 Problem Statement
1. Identify the Problem: Clearly define the problem or challenge.
2. Scope of the Problem: Explain the extent and implications of the problem.
3. Relevance: Discuss why this problem is worth addressing.
This section highlights the reason for undertaking the project and provides a clear understanding of what needs to be solved.
The "Problem Statement" section defines the specific issue or challenge that your project aims to address. It clarifies the problem's nature, scope, and relevance.
1.1 Overview
iv. Example
iii. Step
1. Project Context: Briefly introduce the project and its relevance.
2. Scope Preview: Provide an overview of what the report covers.
3. Engage the Reader: Create interest by highlighting the project's significance.
ii. Important
The overview sets the stage for the entire report, offering readers a preview of what to expect. It helps them grasp the project's subject matter quickly.
i. Definition
The "Overview" section provides a concise summary of what your project is about. It should give the reader a high-level understanding of the project's purpose, significance, and context.
