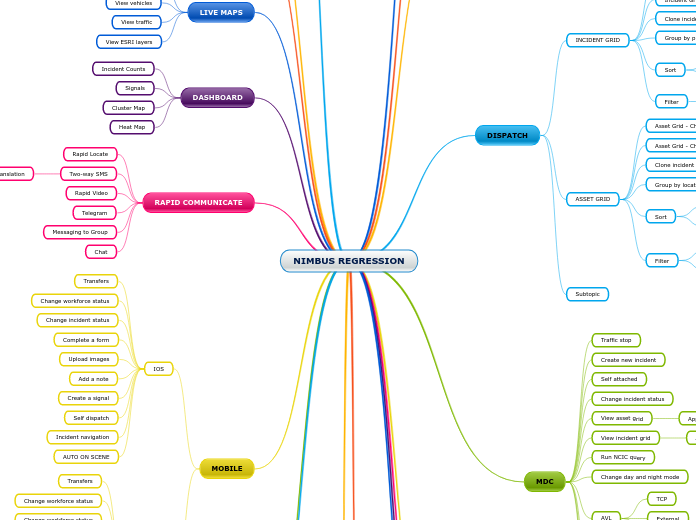
NIMBUS REGRESSION
NCIC - RapidRun
Incident Auto Cloning
SUPPORT
ZENDESK
OCCURRENCE BOOK
Add a new entry
MOBILE
ANDROID
IOS
Incident navigation
Self dispatch
Create a signal
Add a note
Upload images
Complete a form
Change workforce status
Transfers
RAPID COMMUNICATE
Chat
Messaging to Group
Telegram
Rapid Video
Two-way SMS
Translation
Rapid Locate
DASHBOARD
Heat Map
Cluster Map
Signals
Incident Counts
LIVE MAPS
View ESRI layers
View traffic
View vehicles
View responder pins
CALL TAKER FORM
Create a new incident with RapidSOS
Search for existing number
Create new incident manually
Create new incident via CPE
CPE
Check Signals Admin Page
GIVEN that I have Administration permission that I navigate to .../System/Signals
WHEN navigate to .../System/Signal and view the signals on the grid
THEN I should see the timestamp (date & time) the signal came in under Created Time
EXECUTE CPE - SIGNAL CREATED
CLI
Create incident
Update Primary using a responder alias
Update Primary using one vehicle alias
Add remark/note
GIS
SETTINGS
AGENCY
Add disposition codes
Add Aliases
Disable MDC
Add a new virtual vehicle
View Agencies
Change base map
REPORTS
Responder pivot
NEW ORDER PAGE
Create the incident and confirm that an Agency has been added
Add a case to the incident
Add an additional Agency
Proximity calculations
Multi discipline dispatch
Re-activate a closed incident
Close incident
MDC
AUTO ON SCENE
Clear and Close
My Active Incidents
Open with no assigned incident
Open with assigned incident
AVL
Internal
External
TCP
Change day and night mode
Run NCIC query
View incident grid
View asset grid
Apply filter
Change incident status
Self attached
Create new incident
Traffic stop
DISPATCH
Subtopic
ASSET GRID
Filter by Available Assets
- Identify an Asset with there Workforce Status set as Available (we used LBE1) - do not set it as Available
- Load the Asset Grid and search for the Asset using the search box
- Observe the Asset in the grid, with the Workforce Status set as Available
- Select Filter Available Assets
- Observe that the asset no longer show on the grid
- Navigate to the Workforce Management Page (.../Workforce/LiveActivity) and locate your asset
- Change Workforce Status (does not matter to what) and wait for onscreen confirmation
- Verify on Asset grid that the new Workforce status has been applied
- On the Workforce Management Page, change the status for your asset back to Available
- On The Asset Grid, apply the Filter Available Assets filter again
- Observe that your asset remains on the grid
Group by location
Asset Grid - Change Primary
Asset Grid - Change vehicle status
INCIDENT GRID
Filter
Agency
Sort
By reference
By date
Group by priority
Clone incident
Incident Grid - Change vehicle status
Incident Grid - Change Primary
RESPONSE PLANS
Change an existing response plan - remove named vehicles and use on new incident
Use existing response plan
Create a new response plan with named vehicles and use on incident
WORKFORCE MANAGEMENT
Remove Responder from vehicle
Remove vehicle from Provider
Add vehicle to a Provider
Assign responder to vehicle
Update Responder status
Update Vehicle status
Change a Provider status
USER MANAGEMENT
Change Password
Reset Password
Forgot Password
Enable a user
Disable a user
Unlock an user
Update an existing user
Create a new user
