NIMBUS REGRESSION
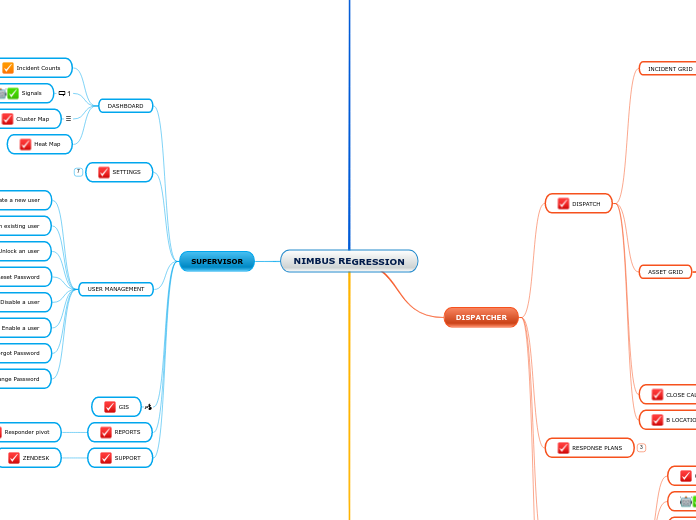
SUPERVISOR
SUPPORT
ZENDESK
REPORTS
Responder pivot
GIS
USER MANAGEMENT
Change Password
Forgot Password
Enable a user
Disable a user
Reset Password
Unlock an user
Update an existing user
Create a new user
SETTINGS
AGENCY
Add disposition codes
Add Aliases
Disable MDC
Add a new virtual vehicle
View Agencies
Change base map
DASHBOARD
Heat Map
Cluster Map
Cluster numbers will increase with new closed incidents the next day.
when testing, take a screen shot at the time of regression testing and then 24 hours later check clusters map again to ensure increase in numbers is present
Signals
Validated on the New Orders Tab.
Validate count -> Send in Signal -> Validate Count
Incident Counts
RESPONDER
MDC
Clear and Close
My Active Incidents
Open with no assigned incident
Open with assigned incident
AVL
Internal
External
TCP
Change day and night mode
Run NCIC query
View incident grid
View asset grid
Apply filter
Self attached
Create new incident
Traffic stop
MOBILE
ANDROID
IOS
AUTO ON SCENE
Incident navigation
Self dispatch
Create a signal
Add a note
Upload images
Complete a form
Change incident status
Change workforce status
Transfers
NCIC - RapidRun
DISPATCHER
OCCURRENCE BOOK
Add a new entry
WORKFORCE MANAGEMENT
Remove Responder from vehicle
Remove vehicle from Provider
Add vehicle to a Provider
Assign responder to vehicle
Update Responder status
Update Vehicle status
Change a Provider status
RESPONSE PLANS
Change an existing response plan - remove named vehicles and use on new incident
Use existing response plan
Create a new response plan with named vehicles and use on incident
DISPATCH
B LOCATION
Nimbus: Support Custom (Non-Provider/Facility) Destination for Units
Nimbus CAD now supports the ability to indicate a unit’s Secondary Location as an ad-hoc verified address, rather than the previous limit to pre-defined Providers and Facilities. This feature increases the flexibility of Nimbus CAD in providing location details when units are still maintaining assignment to the original CAD Event location but may need to temporarily update their location to accommodate further investigation or a transport to a non-provider location. This increases situational awareness for dispatchers and responder safety in the field.
CLOSE CALLS
AUTO CLOSE
Automatically close open Nimbus signals that have no associated Incidents
CAD administrators want the Nimbus system to automatically close out any signals that haven't been turned into CAD incidents after a period of time, so that these open (unresolved) signals do not stack up in the system and potentially affect system performance.
This is especially a problem in pilot or early production sites where Nimbus is connected to CPE so that it receives live 9-1-1 calls, but nobody is using Nimbus at the time. Nimbus now provides an Administrative configuration that allows for configuration of the Signals timeout to be set at a tenant configurable threshold. The threshold for timeout is set in whole hours formatting and starts at a minimum of 1 hour with a maximum of 72 hours, depending on the PSAP’s preferences.
ASSET GRID
Filter by Available Assets
- Identify an Asset with there Workforce Status set as Available (we used LBE1) - do not set it as Available
- Load the Asset Grid and search for the Asset using the search box
- Observe the Asset in the grid, with the Workforce Status set as Available
- Select Filter Available Assets
- Observe that the asset no longer show on the grid
- Navigate to the Workforce Management Page (.../Workforce/LiveActivity) and locate your asset
- Change Workforce Status (does not matter to what) and wait for onscreen confirmation
- Verify on Asset grid that the new Workforce status has been applied
- On the Workforce Management Page, change the status for your asset back to Available
- On The Asset Grid, apply the Filter Available Assets filter again
- Observe that your asset remains on the grid
Group by location
Asset Grid - Change Primary
Asset Grid - Change vehicle status
INCIDENT GRID
Filter
Agency
Sort
By reference
By date
Group by priority
Incident Grid - Change vehicle status
Incident Grid - Change Primary
CALL TAKER
SUBSCRIBER GROUPS: INTERNAL + EXTERNAL
Support Subscriber Groups Notifications accounting for internal, external users and permission groups
Subscriber Notifications via SMS have been extended to allow easier selection of internal Nimbus Users and continued support of manual subscribers and external users. This provides an easier means of managing internal recipients and eliminates maintaining user SMS profiles in two different Admin screens
SUBSCRIBER GROUP NOTIFICATIONS
Support Subscriber Groups Notifications by Agency Response Area (Jurisdiction)
Nimbus now supports the ability to set notifications to occur only when a certain incident type occurs within an Agency’s jurisdictional boundary (response area). This important feature helps administrators to define recipient notifications to subscribers, only when an event occurs in their area/region. This functionality reduces confusing notifications across the platform and allows for alerting for the user’s agency operations and command. Administrators can define Subscriber Groups with or without the Agency filter now to allow increased flexibility. Changes in incident location or event Call-Type will also support triggering an SMS notification, based upon rules set above for ease of automation.
AUTO CLONING
RAPID COMMUNICATE
Chat
Messaging to Group
Telegram
Rapid Video
Two-way SMS
Translation
Rapid Locate
CLI
Create incident
GIVEN that Dispatched logged in
WHEN go on CLI or enter // on any Incident screen
WHEN Command Line Interface screen is open
WHEN type “BOMB” and required parameters
THEN New Order page should display with Incident Type and
parameters entered
Update Primary using a responder alias
GIVEN that Dispatched logged in and Incident exists
WHEN go on CLI or enter // on any Incident screen
THEN Command Line Interface screen is open
THEN Incident's primary responder can be updated using PU CLI command
Update Primary using one vehicle alias
GIVEN that Dispatched logged in and Incident exists
WHEN go on CLI or enter // on any Incident screen
THEN Command Line Interface screen is open
THEN Incident's primary vehicle can be updated using PU CLI command
Add remark/note
GIVEN that Dispatched logged in
WHEN go on CLI or enter // on any Incident screen
THEN Command Line Interface screen is open
THEN Incident's remark/ note can be added using N CLI command
LIVE MAPS
View traffic
GIVEN Dispatcher is logged in and on Live Activity/ Live Maps page
WHEN Legend icon is clicked, and Traffic checkbox is checked
THEN Life maps is showing the current traffic
View vehicles
GIVEN Dispatcher is logged in and on Live Activity/ Live Maps page
WHEN Legend icon is clicked, and Vehicles checkbox is checked
THEN Life maps is showing vehicles that are currently responding.
View responder pins
GIVEN Dispatcher is logged in
WHEN Incident details are saved, and vehicle and responders are assigned
THEN Life maps is showing the responder pin
CALL TAKER FORM
Create a new incident with RapidSOS
Search for existing number
GIVEN that Call Taker is logged in and Incident created via CPE call with a certain number exists
WHEN clicked on Call Taker/ Call Taker Form
WHEN phone number specified in precondition is entered and Search
button is clicked
THEN Existing Incidents drop down list is displayed and showing Incidents associated with the phone number
Create new incident manually
GIVEN that Call Taker is logged in
WHEN clicked on CREATE INCIDENT from Call Taker modal
WHEN data is entered in required fields
THEN new incident is created manually
NEW ORDER PAGE
Create the incident and confirm that an Agency has been added
Add a case to the incident
Add an additional Agency
Clone incident
ETA CALCULATIONS
GIVEN an incident is open and Vehicle x is submitting location information
WHEN assigning Vehicle X to the incident
THEN the approximate ETA of that vehicle must be displayed (see image ETA)
Multi discipline dispatch
RE-ACTIVATE A CLOSED INCIDENT
GIVEN an incident is closed
WHEN re-activating the incident
THEN the incident will be re-opened
CLOSE INCIDENT
GIVEN an incident is open
WHEN the incident is closed
THEN the user will be presented with an option to CLEAR assigned units or to CLOSE the incident
Close Button change to Re-activate Button
View Report
Close Incident
Clear Units
CPE
EXECUTE CPE - SIGNAL CREATED
GIVEN a call taker is logged on
WHEN a CPE signal is sent to a position that does NOT have the Call Taker Form open, and the contact number does not belong to an open incident
THEN the signals counter will be incremented (see image Signal A)
and the signal will appear in Settings - Signals (see image Signal B)
Signals appears on Signal Admin Page
GIVEN that I have Administration permission that I navigate to .../System/Signals
WHEN navigate to .../System/Signal and view the signals on the grid
THEN I should see the timestamp (date & time) the signal came in under Created Time
Signal banner counter incremented and dropdown populated

![[Design Map of the Dog] [Design Map of the Dog]](/image/e54225d12a7647f69f5ec9aec88cb416/design-map-of-the-dog.png)


